
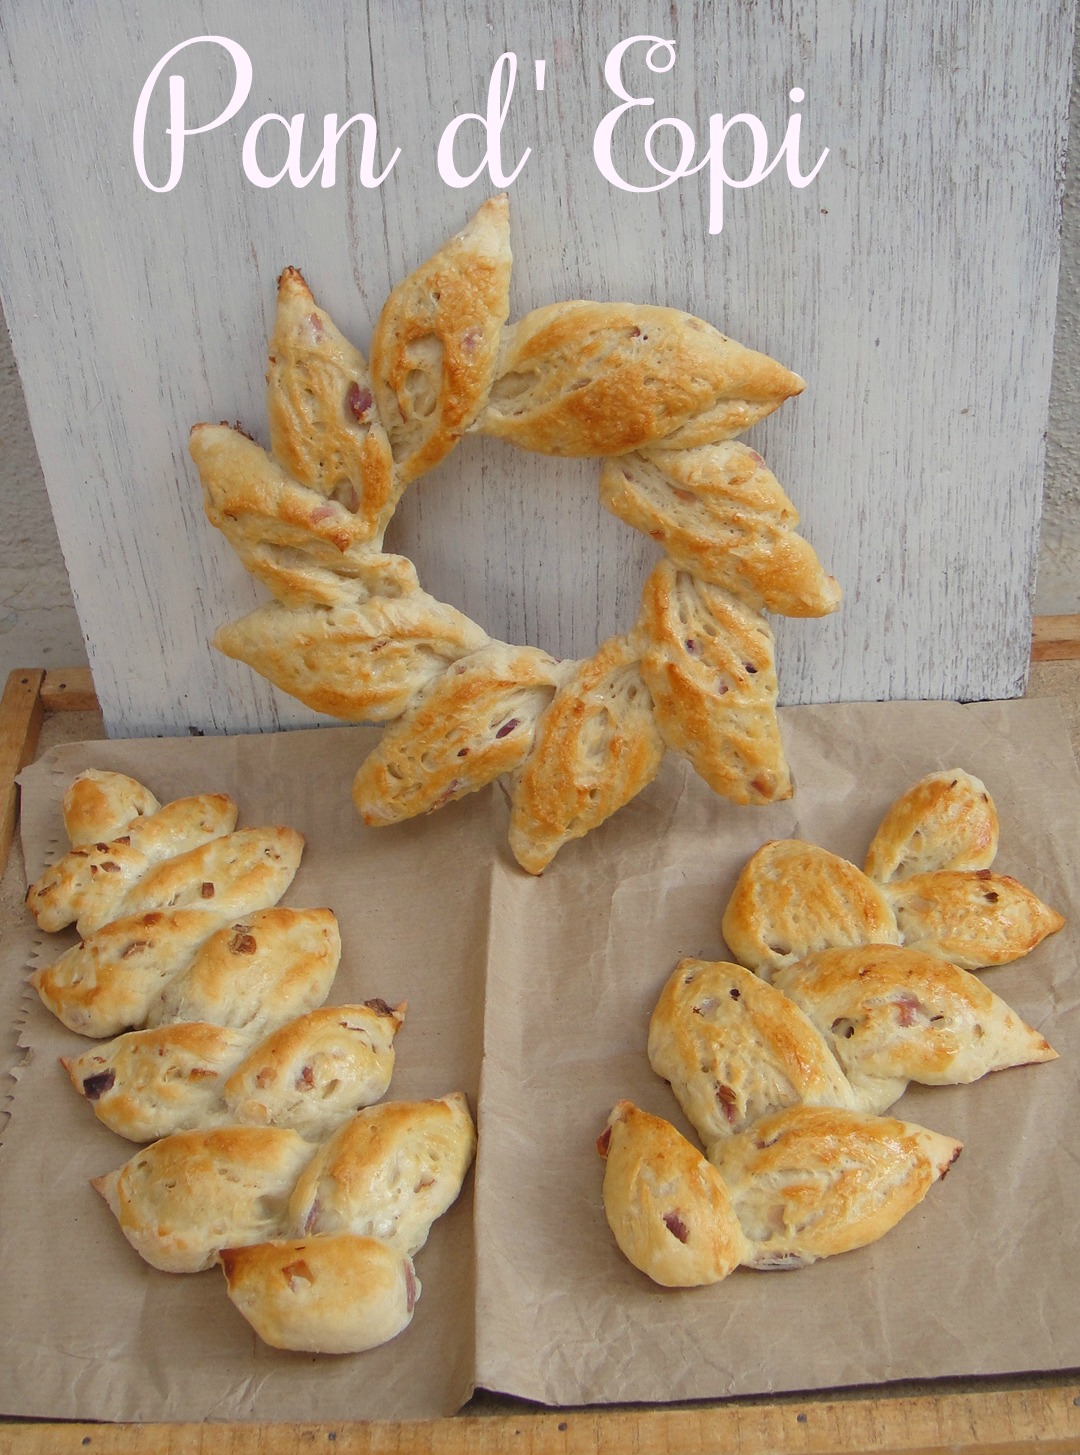
Epi is the French word used to describe the flower of a wheat stalk. So the Pan d’Epi or Épis de Blé is the name given to bread that looks like a wheat stalk or the ears of wheat.

The Pan d’Epi is a classic and commonly made French artisan bread. When made for special holidays and celebrations, this bread is often made more decorative by shaping it into a wreath.

The Pan d’Epi is a classic and commonly made French artisan bread. When made for special holidays and celebrations, this bread is often made more decorative by shaping it into a wreath.
The Pan d’Epi is easy enough to make and really just one step up from the French baguette. It is made the same way but then cut to resemble a wheat stalk. It is eaten just a baguette and can be served with soup, or used to make sandwiches.

This bread is best eaten fresh, the day it is made. It is best stores wrapped in paper until it is used. If the bread starts to go stale, revive it by sprinkling it with water and briefly baking it. Otherwise, use it to make croutons or breadcrumbs.
A Pan d’Epi is a plain bread but I decided to add some caramelized onions to mine just to add some flavour. You may omit this if you want to stay authentic with the bread. I also chose to make a round Pan d’Epi wreath because my baking sheet and oven would hold this shape better.
For this month's Bread Bakers Wendy of A Day in the Life on the Farm of choose to make International Breads . I made this french bread......
Requirements :
1 large onion, finely chopped
1 tbsp oil
2 1/2 cups all-purpose flour
1 tsp salt
1 1/2 tsp instant yeast
1 tbsp oil
3/4 to 1 cup warm water
Method:
Heat the oil and add the chopped onions to it. Sauté over medium heat till they turn a nice deep brown. Take it off the heat and let it cool.
Put the remaining ingredients, except the water, in a bowl (or processor bowl) and mix well. Add enough warm water and knead until you have a soft and elastic dough, almost sticky dough.
Add the caramelized onions and knead it into the dough till distributed uniformly. Shape into a smooth ball and place it in an oiled bowl, turning it to coat it well with oil.
Cover loosely and let it rise for about an hour to an hour and a half till it has doubled in volume.
Add the caramelized onions and knead it into the dough till distributed uniformly. Shape into a smooth ball and place it in an oiled bowl, turning it to coat it well with oil.
Cover loosely and let it rise for about an hour to an hour and a half till it has doubled in volume.
Dust your working surface lightly with flour. If you’re going to shape it as a long wheat stalk (or two if your oven or baking sheets aren’t large enough to take one long one), then press out the dough into a rough rectangle.

Fold the long edge away from you towards the center. Fold the long edge near you towards the centre. Now fold over in half, like a letter fold and pinch the seam together neatly and tightly. See this tutorial for a better idea on shaping a baguette. (https://www.youtube.com/watch?v=wmu1rg4CPgk )
Fold the long edge away from you towards the center. Fold the long edge near you towards the centre. Now fold over in half, like a letter fold and pinch the seam together neatly and tightly. See this tutorial for a better idea on shaping a baguette. (https://www.youtube.com/watch?v=wmu1rg4CPgk )
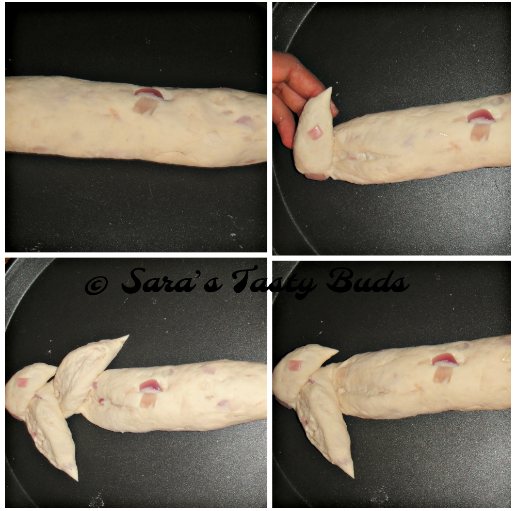
Sprinkle flour generously over the baguette. Starting with one end of the baguette, make equidistant cuts in the dough (about three inches apart) holding a pair of scissors so they are parallel to the bread, and then tilting them so they are at a 45-degree angle.
Make the cuts in the dough almost as if you were going to snip that bit off but it will still be attached, then take that piece and move it to the left. Make another snip about 3 inches down from the bottom of the last one and move that piece to the right. Keep on doing this until you reach the end of the bread. See this video for a better understanding of this process. (https://www.youtube.com/watch?v=aN5QL_kaowQ )
Make the cuts in the dough almost as if you were going to snip that bit off but it will still be attached, then take that piece and move it to the left. Make another snip about 3 inches down from the bottom of the last one and move that piece to the right. Keep on doing this until you reach the end of the bread. See this video for a better understanding of this process. (https://www.youtube.com/watch?v=aN5QL_kaowQ )
If you want to make a wreath like I did, then take a look at this tutorial (http://www.artisanbreadinfive.com/2008/12/08/holiday-wreath-bread ) first. Place the risen dough on a floured surface.
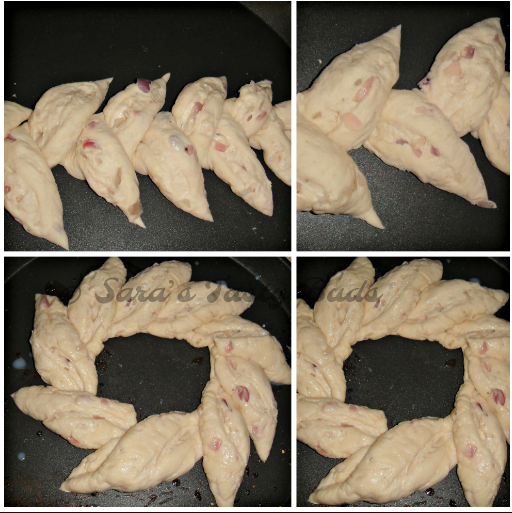
Gently poke a hole through the dough in the centre with your fingers and stretch out the dough into a round ring. Place this on the parchment lined baking sheet and then generously dust the top of the dough with flour.

Gently poke a hole through the dough in the centre with your fingers and stretch out the dough into a round ring. Place this on the parchment lined baking sheet and then generously dust the top of the dough with flour.
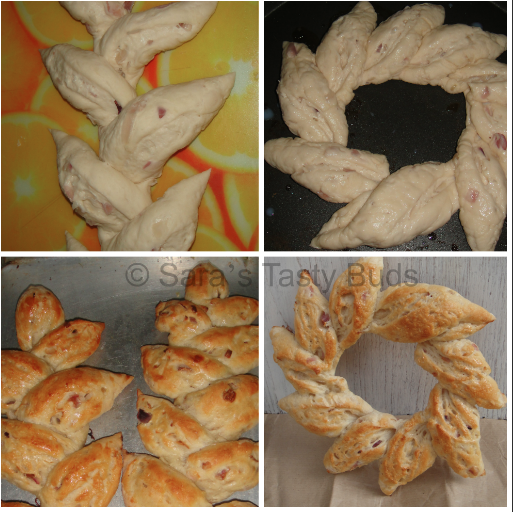
As described above for the baguette, make cuts about 2 inches apart and move each portion outward forming a wreath. Once the Epi has been shaped, loosely cover the dough and let it rise again for about 15 minutes.

In the meanwhile, preheat your oven to 240*C (470*F) with a baking tray upside down on the rack and an empty pan at the bottom of the oven.
When ready place the Epi in the oven and pour a cup of water into the pan at the bottom to create steam.I didn't use steam .
Bake for about 15 to 20 minutes till the Pan d’Epi is done and golden brown in colour. Let it cool completely before cutting.
Enjoy the onion flavoured Pan d'Epi..........
We Knead To Bake #42
#BreadBakers is a group of bread loving bakers who get together once a month to bake bread with a common ingredient or theme. You can see all our of lovely bread by following our Pinterest board right here. Links are also updated after each event on the #BreadBakers home page.
We take turns hosting each month and choosing the theme/ingredient. If you are a food blogger and would like to join us, just send Stacy an email with your blog URL to foodlustpeoplelove@gmail.com.

so beautiful and crafted so well ! great job, Saranya
ReplyDeleteI am only about halfway through the group so far but I think this loaf wins for most beautiful this month.
ReplyDeletePain d'epi looks so pretty and you have the shape down perfectly! The caramelised onions would have added such a nice flavour to it
ReplyDeleteThe caramelized onion are such a nice touch! Your wreath is so pretty too.
ReplyDeleteBeautifully done. I'm not sure if I have the patience to make it but you make it sound simple
ReplyDeleteHello Sharanya, Lovely beautiful and amazing bread. It is shaped so well. Loved your addition of caramelised onions.Can see the onion specks all over.
ReplyDeleteWhat a beautiful bread, Sara. I love the onion in there. I bet it adds great flavor to this pretty loaf.
ReplyDeleteBeautifully shaped bread. I've made this bread and love how crusty it turns out.
ReplyDeleteThat is such a beautiful and flavorful bread. Love the addition of onions in there.
ReplyDeleteWow, this bread is a work of art! Just Beautiful!
ReplyDeleteHello Sharanya,
ReplyDeleteI admire your patience, when I look at this beautiful craft. Nice idea to add caramelized onions. Can I add mushrooms too?
Sonia